|
Welcome to my art blog. I have been thinking about creating this for a long time, and have been looking forward to sharing it with you. I have enjoyed teaching art to all ages in Mendocino county for over 30 years. Watercolor has always been my first love in art mediums, followed by pen and ink, and printmaking. I also enjoy creating wearable art silk scarves. Painting with dyes on silk can be very similar to wet on wet watercolor painting. Currently I am teaching watercolor for Mendocino College in Ukiah, and Willits, California. It is a great joy to share watercolor with people who are just beginning in the medium, or more advanced artists who need motivation to keep them painting. Watercolor can be unpredictable, and challenging, but very rewarding, and that is what keeps me motivated. You never really know for sure what will happen when you start your painting session. Sometimes my favorite part is a mistake that I wasn't expecting, which, when dry, turned into something more beautiful than I could have created if I had tried. Each month I will be sharing some of my favorite art tips. Brushwork, Leaves and Flowers Exercises. If you have not painted in awhile, or just want to warm up, a brushwork exercise is fun. If you let your brushes do the work for you, watercolor is much easier. The two brushes I use the most are a 1” flat aquarelle with a clear beveled handle, and a #12 synthetic round. Good choices for the aquarelle are Connoisseur and Princeton. My favorite synthetic brushes are called Beste, and I have only found them at Jerry’s Artarama online. These brushes come to such a great point, that I do not have to switch to a detail brush to complete my painting. 1. I like to experiment with fences, lifting, waves, brick shapes and dry brush. The flat brush is used on the left, and gives a very clean, sharp edge. The beveled brush handle can be used for scraping (scraping semi-dried color off the paper to make white lines), and bruising (bearing down with the brush handle on wet color, to make dark lines) A drier brush will make grasses. The round brush can be used in the same way but will give softer results, and is great for leaves, foliage, and flowers. These exercises will help you choose the right brush for your painting needs.  2. Double loading the brush with wet color: Load the brush with light green then put the tip in dark green and paint one side of the leaf and then the other side. Orchid shapes are fun to try and well as other leaves and flowers. Only the round brush is used here. 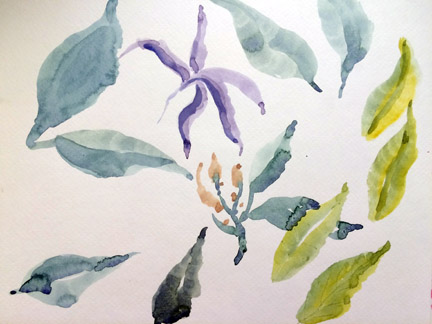 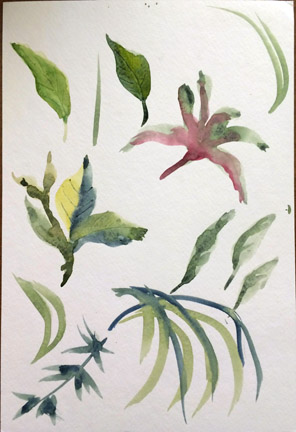 Ways To Apply Watercolor A good watercolor sketchbook is essential for doing any exercises, or for your daily sketching, and it should be at least 140# paper. I like a wire spiral binding, but look for a book that opens flat. Strathmore or Canson make good, basic watercolor paper, and there are many sizes of sketchbooks available. I like their Visual Journal. I use Arches 140# watercolor paper for most of my paintings. In planning your painting,the amount of water you use in your paint is going to make a big difference in your results. 1. Wet on wet is my favorite way to start a painting, wetting the paper and then putting in free flowing color. After letting the painting dry, I can re-wet the paper with a brush or water sprayer and add more color if I need it. This is a good technique for clouds. 2. I usually add the next layer of color wet on dry, which is known as glazing. This method offers a lot of control, and you can layer many times, each time drying in between. This can be used to portray fabric and rendering anything in your painting that has definite edges. The colored strokes were applied first, then dried. Then the blue strokes were laid over the top. 3. The next technique is dry on dry. Wipe the water off your brush onto a cloth, and use paint with very little water in it. Lay the color over your paper so the brush only hits the top texture of the paper. This is especially good for ocean waves or adding texture to your painting. I use it to portray grasses and fabric. 4. Last is dry on wet. Working on wet paper, that has lost it’s shine, mix your paint with less water and apply to paper. This is good for trees or other things that you want to have a soft edge, but do not want to lose their shape. I used this technique to paint the tree behind the house, and scraped off the lines with my aquarelle brush handle. 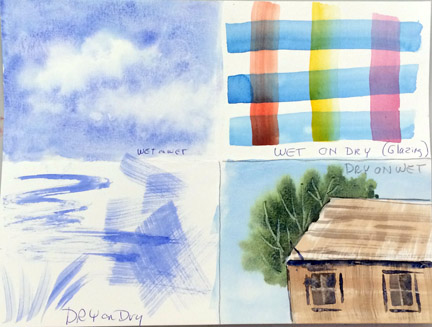
1 Comment
|
AuthorI have been an artist and craftsperson all my life. I have lived in Willits for over 30 years and am very active in the art community. I have been the recipient of several arts grants and artist residencies in the local schools. I have been teaching watercolor for Mendocino College for 16 years. Archives
April 2021
Categories |
 RSS Feed